Sunday, January 8, 2012

COSCBWI Meeting January 2012: Ready, Set, Write!


I know I usually post a summary of COSCBWI's monthly meetings, but today I'm going to tell you about it beforehand!  The Central and Southern Ohio Society of Children's Book Writers and Illustrators (whoo--what a mouthful!) will be hosting our first 2012 meeting on January 14 at 1:00 PM at the Upper Arlington Tremont Library.  Dubbed, "Ready, Set, Write," the meeting is going to focus on your writing/illustrating goals and a group brain-storming session on steps to help you achieve them in 2012.  It's open to all members, and prospective members, too--so if you're thinking about joining SCBWI, this is a great time to see if our group is a good fit for you.  

As the Membership Coordinator of COSBWI, I am usually at every meeting to welcome you with a smiling face and answer your many questions.  However, I am disappointed to say I will be absent from the event next weekend.  (I will be meeting Mickey Mouse, though, so I guess I'm not too disappointed!)  Don't make my absence sway your attendance; our awesome group leaders and super-friendly congregation of writers and illustrators will certainly make you feel like family. :)

If you live in the Columbus, Ohio, area and are interested in writing or illustrating for children, I hope you will attend!  You can find more information on our group website at: www.coscbwi.org.  (And if you decide to join, then I will definitely see you at the February meeting!)

Have fun!  (I promise I'll think about you while I'm waiting in line for Space Mountain...)

Note: I believe I am obligated to say that although I am the Membership Coordinator of COSCBWI, this blog is in no way affiliated with the local chapter or national branch of SCBWI.  The thoughts and opinions expressed in this blog are my own, and all that legalese stuff.

Wednesday, January 4, 2012

Step By Steps: "Do You See What I See?"

I'm happy to say that my 2011 Christmas card seems to be a hit!  Since I mailed it out and posted the pic to my blog a few weeks ago, I've been asked many times, "How do you do that in Photoshop?"  First, I'll disclaim that I am NOT AT ALL an expert when it comes to this technology!  But, I loooooove to get a peek of behind-the-scenes stuff myself, so I figured I'd oblige and show you the basic process of how I currently make digital art.

Step 1: Sketch 'n' Scan


I always first sketch out my piece then scan it into the computer.  (Thus far, I've never been able to sketch something directly in Photoshop without it looking like it was made by a preschooler.)  To make my life easier, I measured out the card dimensions in my sketchbook and drew the picture accordingly so I wouldn't have to worry about resizing the whole thing later.

Step 2:  Lineart


After I scan my sketch into the computer, I go over all the lines in black using a "hard brush."  When I'm done, I basically have a coloring book sheet which I can fill in with paint.  I usually draw each character on their own layer so I can move/re-size them independently.  This is the first time I've ever drawn a city background, but it was easier than I had initially feared.  I simply went over each sketched building edge with the "line tool," merged my resulting 40+ layers into one, and voila!  Instant Bethlehem!

Step 3: Basic Background/Re-sizing

You may notice, I added an extra sheep to the flock here, too!

At this point, I like to lay some primary background shapes in the pic before I color the characters.  By doing so, it makes it easier for me to visualize the end result--and it lessens the chance of me having to move fully-colored, multiple-layered characters later.  Here, I can move the characters anywhere I please with the greatest of ease, and I even re-sized Bethlehem since it seemed a little looming in comparison to the sheep.

Step 4: Basic Coloring


Once the characters and other lineart features are where I like them, I paint them in solid colors, using the mid-tone of what I imagine their ultimate shading will be.  Depending on the complexity of the character, I put the colors on different layers.  (For example: the big sheep in the front had three levels of color--one for his coat, one for his face and ears, and one for the pink in his ears.)  This may sound confusing, but it helps me keep the colors separate when shading and makes fixing any mistakes a breeze!  Just like when coloring in a coloring book, I stay inside the lines and clean up any messy parts with the eraser.

Step 5: Shading 

I thought that middle building needed a door here.  I was wrong.

For shading, I like to create a palette for each solid part of each character using two lighter colors and two darker colors.  Then I use the "airbrush" and start shading, changing my opacity along the way.  To make sure I don't go out of the lines, I "lock" my layer so I can only color on the confines of each base.  (For example, when I lock the white of my sheep, I can draw on top of it, but the program won't let me draw on the green or purple parts around it.  Neat, huh?)  I was worried about the buildings in this picture because it's not something I'm used to shading, let alone in Photoshop.  But, with my discovery of how to use the "gradient" tool, I simply used the "lasso" to select each side of the building and added a gradient of two colors--one darker than my base, one lighter.  Voila!  Instant shaded Bethlehem! 

Step 6: Cleaning Up and Merging


This is where the illustration really comes to life!  After I'm done shading, I make sure the characters and features are EXACTLY where I want them, then add the final details like the shadows and palm trees.  Here, I also redid the milky way and finished the sky using pre-made star brushes.  (The goody two-shoes in me cringes at this shortcut.  I try to use pre-made brushes as little as possible.)  At this stage, I also clean up any bits of paint outside the lines that I might have missed earlier.  I debated coloring the lineart here to match the characters, but decided I liked the cartoony look of the heavier black lines.  I also played around with white shines on the eyes, but ultimately left them off since they didn't print well on my NOSCBWI calendar piece.  Once everything is to my liking, I add my signature, merge all the layers together, and save as a JPEG.  (Total layers of this piece: about 55--not counting the 40ish lines that made up the city before merging.  Total hours: A lot.)


Step 7: Color Palette

This is the smallest amount of colors I've used yet!

To keep all my colors easily accessible (and to avoid losing them on all those layers), I've started using a separate document as my painter's palette.  I keep it open the entire time and add more colors to it as I go.  (When I don't do this, colors are lost, mistakes are made, and tears are shed.  LOTS of tears are shed...) 

And that's how I do it!  I'm sure this is not the most efficient way of doing things, though, so I'm always reading online tutorials to help streamline the process.  (Heck, if you have any pointers, I'd LOVE to hear them!)  This is just how I can do it right now to the best of my ability.  :)

Sunday, January 1, 2012

2012 Resolutions!


Happy New Year everyone!  I hope you had a fun time ringing in the new year!  I had a delightful evening snuggling with my hubby and doggy while drinking mead and watching movies.  (Well, the doggy didn't drink mead, but she certainly begged her way to a few pieces of popcorn!)

Now that the festivities are over, it's time to ponder our plans for the new year and make promises to ourselves that we probably aren't going to keep.  (I think we're all guilty of this!)  BUT, you can achieve your array of goals if you set yourself up for success.  While resolutions like, "I'm going to get published in 2012" may sound inspiring, I've found it's better to make smaller, more-attainable pledges.  If you do so, your likelihood for success is much higher AND you build the foundation that can help you reach your ultimate, reach-for-the-stars dreams!

So what are my resolutions for 2012? 

Writing:
~complete another round of revisions on Beast of Bannock manuscript
~finish first draft of "Project Pirate Ferret"
~send out more query letters (blegh)
~catch up (and keep up) with SCBWI bulletins
~continue this delightful blog  :)
~uncover the One Big Secret to publishing success  ;)

Art:
~illustrate one full digital picture a month
~practice drawing humans (NOT my forte)
~learn how to digitally paint fur and grass (again, NOT my forte)
~complete another month or two of the exercise "30 ____ in 30 Days"
~join an online art network
~feel confident enough to throw my hat into the illustrator ring

Pertaining to Health and/or Sanity Well-Being:
~play video games once a week
~take dog for walk twice a week (*does not apply when snow is taller than dog)
~watch all movies that are still in plastic wrap
~try one new recipe per month
~strive to be in bed before midnight
~spend more quality time with my hubby and furry family
~figure out how to clone self

There you go!  You'll note there's nothing ginormous on the list; just small, attainable endeavors that I should be able to accomplish in the next 365 days.  (In fact, I'm already accomplishing my goal to keep up with my blog with this post!  Score!)  And do feel free to get on my case about any of the items above; friendly motivators are the key to success!  What are some of your goals for 2012?

I wish you a happy, healthy, fortunate and creative new year!  Welcome 2012!

Note: Pic is from Google images.

Saturday, December 24, 2011

Merry Christmas!

I just want to wish everyone a very Merry Christmas!

Penny says, "Santa better bring me extra presents for this!"

I hope you have a wonderful time celebrating with your loved ones! :)

Friday, December 23, 2011

Christmas Card 2011

This year, I decided to illustrate my own Christmas card to send to my family and friends.  Everyone should have received their cards by now, so I can finally share my picture with you!

"Do You See What I See?"

I made this design for three reasons:

1) I adore sheep.  If you've known me for the past decade, then you may recognize this little guy from a short computer graphics movie I made back in 2004.  I recently re-discovered the movie on my old computer and felt compelled to draw some sheep again.  :) 

2) I looooove the Christmas song, "Do You Hear What I Hear?"  The personification and repetition used in the lyrics is just delightful!  Obviously, the first stanza of the song was the direct inspiration for this piece.  (Secretly, I would love to illustrate a picture book of the entire song...)

3) Over the past year, I lost both of my remaining grandparents and hubby lost his grandma.  Although I had many Christmas card ideas, each time I thought of this one, I just knew it was the picture they would have wanted to see.  Grandmom Sophie, Grandpop Walter and Grandma Ruth--this card is for you.

The inside of the card read simply: "May your season be filled with wonder and joy!"

I hope your season has been one of wonder and joy, too!  Merry Christmas!

Wednesday, December 21, 2011

Recipe: Chocolate S'mores Pretzels!

One of my favorite things about the holidays is the abundance of delicious food!  For several years now, I swore every Christmas that I was going to make chocolate covered pretzels, then ran out of time to do so.  This year, though, I bought all the ingredients and started dipping before the season could fly by once again.  After some trial and error (and burned batches of chocolate), I made three sets of pretzels to give away as gifts: White Chocolate Peppermint, Milk Chocolate Toffee and Dark Chocolate S'mores.  All three varieties have so far been a hit, so I thought I'd share one of the recipes with you!
 
Mmmmm....S'mores Pretzels....
 
Chocolate S'mores Pretzels
 
I loooooooove s'mores, so when I was buying ingredients, I purchased some graham crackers and marshmallows to experiment with.  I think they actually turned out to be the tastiest--and easiest--of the pretzel varieties I made.  To make them, you'll need:
 
-2 12-ounce bags of dark or milk chocolate chips  (I used Hershey's Dark)
-1 large bag of twisty pretzels (I bought the Family Size bag)
-1 package of mini marshmallows
-1 sleeve of graham crackers
-wax paper
-hook, fork, etc. for dipping (your preference)
-empty spice bottle with shaker top (if you have one)
-lots of counter space
-a friend OR grow some extra arms (Note: a friendly octopus is ideal)
 
Steps:
~Fill bottom part of the doubler boiler with an inch or two of water.  Melt both packages of dark chocolate together in top part of double boiler over low heat, stirring occasionally.  My melt time took about 10-15 minutes.  (Note: Slowly melted chocolate is much nicer than quickly burned chocolate.) 
 
~While the chocolate is melting, cover your counter tops with wax paper.  Empty the sleeve of graham crackers into a large, zip-locked plastic bag.  Smash crackers with a mallet or meat tenderizer until they are a crumbly, powder-like consistency.  (No big chunks!)
 
~If you have one available, pour the smashed graham cracker into an empty spice bottle.  Conveniently, I still haven't put together my spice rack from my wedding three years ago, so I have plenty of those laying around.  (See?  Procrastination pays off.)  You can sprinkle the graham cracker onto the pretzels by hand, but I think the bottle made it easier and less-messy.  Open the bag of marshmallows and put both toppings where you will have easy access to them. 
 
~Once the chocolate is melted and the toppings are prepped, start dipping the pretzels into the chocolate.  My pot held about 8 pretzels at a time for dipping.  Flip pretzels in chocolate to cover both sides.  Carefully lift them out of the chocolate and place them on the wax paper.  (Note: If you are messy like me, wear an apron or you will be sorry.  I do not own an apron and was very sorry.)
 
~If you have a friendly octopus, instruct him to place one mini marshmallow in each hole of the pretzel (total of 3 per pretzel) and sprinkle the top of it with a generous helping of graham cracker crumbs.  (Note: Make sure he has cleaned his tentacles first.)  If you do not have a friendly octopus, you will have to do this yourself and pretzel making will take twice as long. 
 
~Continue dipping and topping the pretzels until all of the chocolate is gone.  (I got about 100-125 pretzels for every 2 12-ounce bags of chocolate.)  If the chocolate gets too thick, you can add a teensy bit of vegetable shortening.  (Note: Do NOT add milk, butter, water, or ANYTHING ELSE to thin the chocolate.  Trust me.)
 
~If your friendly octopus is particularly talented, he can dip, decorate and clean up the chocolate you've dripped on your shirt all at the same time.  (You might as well just go sit in the other room and watch "Rudolph" while he takes care of things in the kitchen.  You'll only slow him down.)
 
~Once all the pretzels are chocolate-covered and have been given the s'mores treatment, either leave them on the counter to cool and harden (takes about 3-4 hours) OR put them in the refrigerator.  (Note: If you want to go the refrigerator route, place pretzels on cookie sheets immediately after dipping, otherwise your already messy shirt will probably get messier.)
 
~Put cooled pretzels in pretty tins and give to your loved ones accordingly.  (Note: Remember to reward your friendly octopus with a bowl of marshmallows and tuna fish.  He deserves it.)
 
So pretty!
 
And that is how you make Chocolate S'mores Pretzels!  If you don't have a friendly kitchen octopus, I recommend asking for one for Christmas.  They are well-worth the money and aquarium upkeep.  
 
Some other notes to help you out:
-If you want to make white chocolate covered pretzels, don't use a bag of white chocolate chips.  The white candy melting blocks work MUCH better.
-The white chocolate/candy coating hardens much quicker than the milk and dark chocolates, so apply toppings swiftly.
-*Clean* ornament hooks work great as pretzel dippers!  (Thanks, Dad, for that idea!)
-Wear an apron.  Wear an apron.  WEAR AN APRON.
-Octopi have a tendency to sneak treats when you aren't looking.  Prepare to make extra pretzels in case one or two dozen end up in your octopus helper's tummy.
-Ferrets do not make good kitchen assistants; they will just steal all of your ingredients and shiny tins.

What are your all-time favorite holiday treats?  (Cornflake-Marshmallow Wreaths, Panda Bear Brownies, and my family's yum-tastic Chocolate Chip Cookies are some of the other sweets at the top of my list!)  
 
Happy baking--errr--dipping!  :)

Monday, December 12, 2011

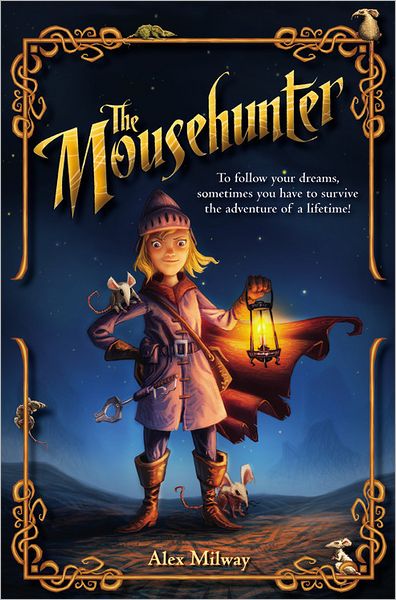
Book Review #7: The Mousehunter

Boy, it seems like forever since I've done a book review!  But after reading several non-Animal Fantasy books in a row, I recently returned to my favorite genre and picked up a great middle grade novel called, The Mousekeeper by Alex Milway.  I'm a sucker for literature about mice, from Brian Jacques' Redwall series to an awesome little book I had as kid called, The Pop Up Mice of Mr. Brice.  Mice are key players in my own novel, too, and I'm always eager to read about other authors' interpretations of the critters.  Milway does not disappoint, and his mice are both creative and adorable.  Here's the flap copy to whet your appetite:
 
Across the Seventeen Seas, there is no mousehunting pirate half as feared as the legendary Captain Mousebeard.  He seeks out the rarest and most precious breeds of mice to collect and trade, his fearsome reputation preceding him wherever he goes.

Emiline, mousekeeper to one of Old Town's wealthiest citizens, is anything but feared.  So when her master puts a bounty on Mousebeard's head, she sees it as the chance of a lifetime.  Her journey takes her on a high-seas adventure, filled with swords and sea monsters, betrayal, lies, and the chance to capture the most dangerous man in mousing history.
 
It's important to note that there aren't actually any talking animals in this book.  However, the story is completely mouse-centric, so it definitely falls under the Animal Fantasy category.  This book is a really fun read with a mix of humor, swashbuckling adventure, and delightful mice.  Milway executes many great writing techniques throughout the book, but I think the two most impressive aspects are his use of world building and animal representation.  
 
The Mousehunter is set in a slightly-steampunk Fantasy world where countless species of mice populate society alongside humans.  The culture is shaped by mice, with Mousekeeping Academies present in the towns, a variety of mousing careers available to humans, and everyday tasks being performed by mice themselves.  Milway's keen attention to detail and mouse-use brings this world to life, from the Powder Mice that assist in loading cannons on ships to the Dung Mouse excrement that is used as fuel.  The human characters even drink mouse-inspired beverages like ''Pipsqueak Beer" and "Rodent Rum."  If not for these elements, it's likely the world would have seemed rather similar to any other pirate story set in the days of pillaging and plundering.  But this prominent sense of mouse-ness makes the world unique and one I'd wish to return to.  On top of an already vivid world, Milway also inserts "excerpts" from The Mousehunter's Almanac in between chapters with a picture of a mouse species, information blurb, and tips for anyone who aims to catch or keep each particular mouse.  This tactic makes the reader feel like a Mousehunter themselves, ready to set off into the wild to discover new species or catch a glimpse of the rarest critters.  It really adds that extra-oomph of fun and authenticity to an already great story.
 
As I mentioned above, the mice "characters" in the story are well-executed, even though they don't actually speak.  (There is really only one main mouse character, Emiline's pet Grey Mouse, Portly, but there are plenty of other mostly nameless mice who participate in the plot, too.)  Despite the fact they don't speak, it is obvious the rodents are intelligent beings with an array of personalities.  One of the first mice readers meet is a wayward Sharpclaw Mouse who obviously takes great pleasure in wreaking havoc and avoiding re-capture by his Mousekeeper, Emiline.  Emiline's own pet, Portly, comforts her, defends her, and assists her throughout the book.  The mice execute schemes together, come to the rescue, and blush at their inappropriate flatulence.  They don't need words for the reader to tell they are happy, scared, worried, or proud, which is a difficult feat for any writer to accomplish.  There are a million ways Milway could have taken his mice, and they way he presents his critters is both satisfying and imaginative.  If you are thinking about populating your own Fantasy world with non-talking yet intelligent creatures, then you will definitely want to check out how Milway pulls it off.
 
If you like Animal Fantasies or have a soft-spot for mice, I definitely recommend picking up The Mousekeeper.  It's also a winner for anyone who likes pirate stories, tales of exploration, and mysteries (did I mention there's a cool curse?)  And it's certainly a great book to use for studying world-building and species-crafting techniques, too!  Book two in the trilogy, The Curse of Mousebeard, is already out in the US, with the third installment, Mousebeard's Revenge, still to be released.  (All three books in The Mousehunter trilogy have already been published in the UK--those lucky ducks!)  I know I'd love to read about more Moose Mice and Mousehunting adventures, so I'll be picking up those other books as soon as I can!
 
You can check out Milway's website here:  http://themousehunter.com/.   And if you read the book, do let me know!  I'd love to hear what you think.  :)
 
Happy reading!  
 
Note: Flap copy is borrowed from the actual book--I had problems finding an authentic book-blurb online.  Cover art is from barnesandnoble.com.